
In this article, we introduce ChatGPT NextChat, a new user interface for ChatGPT. ChatGPT NextChat is an open-source chatbot, that adds additional features to ChatGPT. So, if you’re looking for an improved chat interface for ChatGPT, then NextChat is the perfect choice.
NextChat brings features such as “Awesome Prompts” and “Masks“. Awesome Prompts provides access to “best-practice” prompt templates, useful for time-efficient students who want to start with a template without typing in a lengthy prompt themselves. On the other hand, “Masks” are fine-tuned ChatGPTs for specific objectives. These come with adjusted model and context settings, leading to more accurate and relevant answers. At last, for cost-efficient students, while ChatGPT-4 comes with a subscription cost, NextChat implements a Pay-As-You-Go system via the OpenAI API.
First, you will learn how to use both the web and desktop application, and discover how to deploy the web application on a Vercel server with just one click. Second, we’ll explore features designed to boost ChatGPT’s performance. Finally, we’ll take a closer look at the cost disparities between ChatGPT NextChat’s API expenses and the subscription fees for ChatGPT Pro.
Improving your personal ChatGPT Next Chat
ChatGPT NextChat adds additional features to the standard ChatGPT, named “Awesome Prompts” and “Masks.” With Awesome Prompts, it’s possible to use template prompts by specifying a single word, and masks can be seen as ChatGPTs that can be specialized for specific applications. This allows you to directly construct your own ChatGPT chatbot aimed to suit your personal needs.
Awesome Prompts
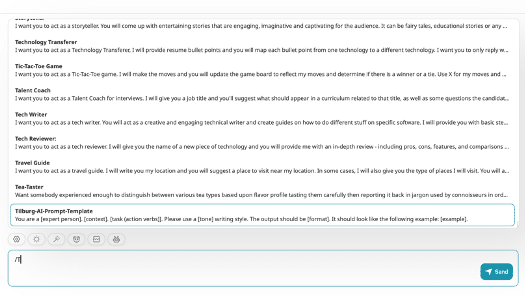
NextChat allows for immediate access in the textbox to the “Awesome Prompts” repository, this feature means that you can start your interaction with the chatbot with a set of prompt templates directly within the prompt text box. By simply typing “/“, you initiate a search functionality that allows you to explore specific prompt keywords. This means you can quickly find and use structured prompts aimed at a variety of scenarios or tasks without needing to build them from scratch.

Once you have discovered your appropriate prompt within the “Awesome Prompts”, simply click on it to insert the template into your text box. From there, you can modify the prompt to suit your specific requirements before pressing enter to initiate the interaction.
For instance, let’s say you’ve selected the “Python Interpreter” template from the Awesome Prompts. This choice allows you to immediately use a structured prompt designed for executing Python code or queries. Again you can adjust the prompt to address your particular coding question or task.

This feature is not limited to pre-existing templates, NextChat also offers the flexibility to personalize this feature by allowing you to add your own prompt template. Navigate to the “Prompt List” section within the Settings and click on the “Edit” button. Here, you have the opportunity to create your own templates. This feature can be effective for repetitive tasks or when you want to have a basic standardized, high-quality prompt. Instead of manually writing out these prompts each time, add them to the Prompt List. Here we specified a standardized prompt, that follows the best practices explained in this article.
With your template prompt added, now, simply use the “/” command to locate your prompt template, insert it, customize it as necessary, and that is it. You have inserted your own high-quality prompt.
Example Prompts
Here are some examples, of how your own Awesome Prompt can look like:
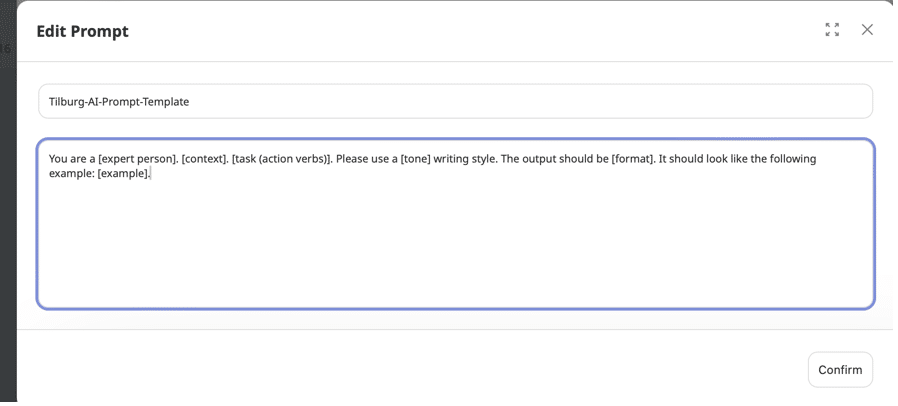
- Title: Tilburg-ai-standardized-prompt
- Prompt: You are a [expert person]. [context]. [task (action verbs)]. Please use a [tone] writing style. The output should be [format]. It should look like the following example: [example].
This could lead to this:
- Title: Tilburg-ai-code-interpreter:
- Prompt: I want you to act as a [your programming language] interpreter. I will give you commands in[your programming language], and I will need you to generate the proper output. Only say the output. But if there is none, say nothing, and don’t give me an explanation. When I need to tell you something in English, I will do so by putting text inside curly brackets {like this}. My first command is “[provide command]”.
We have created a list with some basic prompts for studying and coding, access the file by downloading it underneath. You can insert them into your ChatGPT Next Chat. Only type /”prompt-name” and you find yourself ready with a good-to-go prompt. Of course, feel free to create prompts yourself!
Masks
Similar to the GPTs of ChatGPT, NextChat provides a comparable feature known as “Mask“. Masks are more sophisticated than the Awesome Prompts discussed earlier. It features adjusted model settings, context settings, and additional options to improve the model output.
To access existing Masks or create your own mask click on the “Mask” button on the left panel.

Please note that most Masks are available in Chinese. However, to access Masks specific to other languages, click on “Find more” and then change the language setting to your preferred language.

By clicking on the “View” button, you can observe and download all the specific settings within the Masks, including the prompts and context for the Mask.
To initiate a chat using a Mask, simply press on “Chat“. The application will automatically open a new chat, providing the chatbot with the given instructions.
Setting up ChatGPT NextChat
This section of the article discusses how to set up ChatGPT Nextchat. First, we will showcase how to install the application, then how to insert your personal API key, and finally, how to explore the possibilities of model specification. ChatGPT NextChat can run as a web application, on your desktop, or be deployed as a personal web app. For each application, there is a section. Feel free to scroll down to the section of your interest.
Web Application
ChatGPT NextChat is accessible by clicking on this link. When you enter your first prompt and press enter, it will return an error message, prompting you to specify your OpenAI API key to access the models. If you don’t have an OpenAI API key, check out this article that shows you how to obtain your personal API key.

Next, navigate to the authentication page and enter your OpenAI API key. Click “Confirm,” and you will be redirected back to the previous screen.

Finally, click on the robot (🤖) icon above the input text bar to display the list of available models. Select your favored model and you are all set up. You can start entering prompts.
Desktop Application
The desktop application is available for download on Windows, Linux, and MacOS. To install the desktop version, visit this GitHub repository. Windows users should download the operating system’s ‘.exe’ file. For MacOS, download the ‘.dmg’ file. Follow the instructions to install the application on your operating system. Once you have installed the application, it should launch automatically.

Instead of directing you to an authentication page, it requests that you visit the settings page to enter a valid API key. Navigate to the Settings page, scroll down, and enter your API key into the “OpenAI API Key” field.

Again, you have the option to select your preferred model.
Deploy a Web Application
Running your app on your own computer is fine for personal use, but to make it easily and reliably accessible to others, you need to host it online. Within the ChatGPT-Next-Web GitHub repository, you’ll find the option to deploy your private web application on platforms like Vercel, Zeet, and Gitpod.
Using a service like Vercel not only makes your app accessible, it also manages technical aspects such as security and updates on your behalf. In our example, we will deploy the web app on the Vercel platform by clicking on the “Deploy” button, as indicated below.
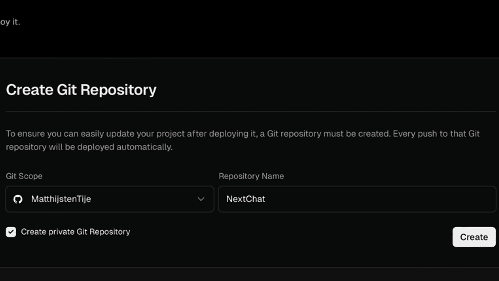
This will open a new tab on your computer, where you will be prompted to log in with your personal GitHub account. This is necessary because you are setting up a private instance; therefore, any modifications made to the application or environment variables will remain secure and confidential on your end.

Next, select your GitHub account and enter the name of the repository you want to use. It’s important that you create a private Git repository.
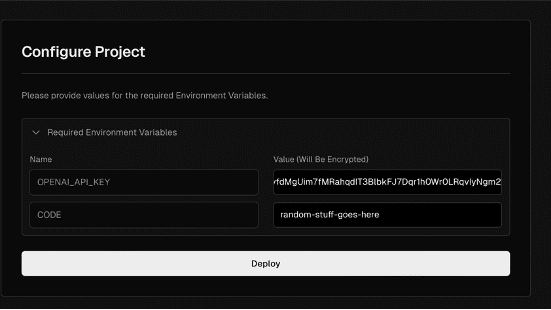
In the following step, under “Configure Project,” enter your API Key. For the rest of the input variables, you can fill them with random text as they do not affect this process. It’s important to note that you can always update your API key later by navigating to the settings. Once everything is set, click on “Deploy“.
After a few minutes, your application will be deployed.
Costs Differences between ChatGPT and ChatGPT NextChat
Accessing ChatGPT directly from the website is free of charge while using ChatGPT-4 requires a $20 subscription fee. However, as earlier remarked, ChatGPT NextChat operates on a Pay-As-You-Go basis through the OpenAI API. This implies that charges are based on your usage, and there are no restrictions on the number of prompts you can use within any specific period.
As the NextChat application allows you to choose from different kinds of models, it’s important to understand the cost structure of the OpenAI API. Costs depend on the chosen model and the length of prompts and responses, which are measured in tokens. Think of tokens as pieces of words, with approximately 1,000 tokens equating to roughly 750 words.
Let’s consider a hypothetical scenario where you’re using GPT-4 to generate text:
• Task: Generate a short article
• Word Count: 600 words
• Estimated Tokens: 800 tokens (calculated as 600 words / 0.75)
Given the GPT-4 pricing of $0.06 per 1,000 tokens, as stated on the OpenAI pricing website, the cost calculation would be as follows:
• Cost Calculation: 800 tokens * ($0.06 / 1,000 tokens) = $0.048
Therefore, generating a short article of about 600 words would cost roughly $0.048.
Please note: Using more advanced models or generating lengthy responses can increase your costs. In addition, if you are a solely ChatGPT 3.5 user, there are costs using ChatGPT NextChat, please be aware.
You can prevent unexpected charges, as OpenAI allows users to set usage limits:
- You can set a monthly budget in your billing settings, after which OpenAI will stop serving your requests.
- You can ask for an email notification once you exceed a given threshold each month.
- Check your usage tracking dashboard to keep an eye on your spending.
Conclusion
ChatGPT NextChat brings the familiar ChatGPT with a renewed interface and additional features. The masks bring the ability to fine-tune your ChatGPT, and the Awesome Prompts feature adds high-quality prompts without the need for manual descriptions. By following the step-by-step instructions in this article and exploring the different features and customization options, you are now equipped to build a personalized chatbot.