Installing ChatGPT inside RStudio can be as simple as a single line of code. OpenAI’s GPT models are among the most widely used large language models today. Typically, you might pose coding questions via OpenAI’s web page. However, with the chattr package, you can interact directly with OpenAI’s ChatGPT models right from RStudio. Chattr allows you to submit prompts to the LLM from your R script, R Markdown file, or through the interface provided within RStudio.
We’ll walk you through installing and using chattr to boost your RStudio experience. We’ll cover model selection, authentication, running the app without blocking the console, using the chattr() function in scripts, and setting up a keyboard shortcut for ease of use. In the end, you’ll find a template R script that has everything you need, making it easy to get started!
But first, let’s look at a sneak preview:
Why Use chattr?
If the sneak preview didn’t speak for itself, here are the reasons why you should use chattr.
Integrating chattr into your RStudio workflow means you can “talk” to your script. Any questions or requests you have can be typed directly into your script, and chattr will provide the answers or code snippets you need.
- Instant Help: If you have a question or need a code snippet, simply type your question in your R script, and
chattrwill provide an answer or code suggestion directly in your script. - RStudio is All You Need: No need to switch between your browser and RStudio. All interactions happen within your RStudio environment.
- Efficiency: Highlight a piece of code or a question in your script, and
chattrwill process it and insert the response right there, saving you time and effort. - Learning Tool: As you receive instant answers and code suggestions, you can learn new functions and methods on the go.
Installation & Authentication
Installation
To get started, install the package with a simple line of code:
install.packages("chattr")
library(chattr)
Once installed, you can launch the app using the chattr_app() function:
chattr_app()When you run chattr_app() for the first time, you’ll be prompted to select your preferred model. This model will be used by default in subsequent sessions unless you change it actively.
# Optional: To avoid the pop-up prompt
chattr_use("gpt4")

# Run the app
chattr_app()

# Response
── chattr - Available models
Select the number of the model you would like to use:

1: OpenAI - GitHub Copilot Chat - (copilot)
2: OpenAI - Chat Completions - gpt-3.5-turbo (gpt35)
3: OpenAI - Chat Completions - gpt-4 (gpt4)

> Selection: # Type the number associated with the model you want to use
After specifying the model, the app will open, allowing you to type in your prompt.

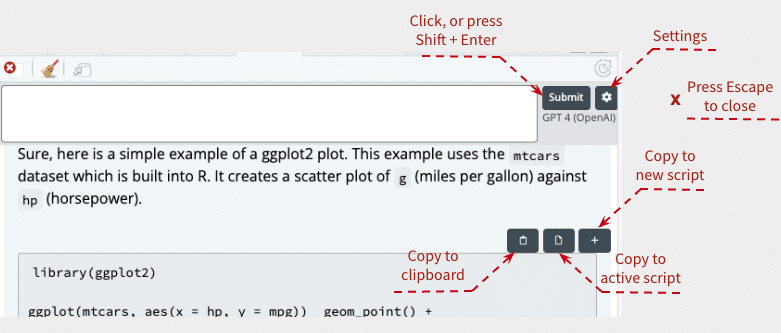
chattr’s Shiny App will open in the viewer pane in the bottom right corner of your screen.Here’s a screenshot showing an overview of the different buttons and keyboard shortcuts you can use with the app:
Authentication
To use the chattr package, you must authenticate with OpenAI by specifying your secret key. The secret key is stored under the OPENAI_API_KEY environment variable, which you can set using Sys.setenv(). For a full-on tutorial on how to obtain your secret key, check out our article.
Sys.setenv("OPENAI_API_KEY" = "YOUR_SECRET_KEY_HERE")Using chattr in R Scripts
In addition to the app, chattr offers several other ways to interact with the LLM directly from your R scripts. While the web interface and app provide a good starting point, the real advantage comes from integrating chattr within your R scripts.
Chattr() Function
The fastest way to interact with the LLM is by calling the chattr() function and entering your prompt there. The response will be automatically inserted into your R script or R Markdown file. Here is an example of a request made to OpenAI:
chattr("How can I remove a column from a dataset?")
# Automatically the answer will be added to your R script or R Markdown file
> library(dplyr)
> data <- data %>% select(-column_name)
The command chattr_app(as_job = TRUE) will launch the app without blocking your console. This means you can continue to write and run other R code while your app is running.
Highlighting Requests in an R Script
For an even better experience, you can set up a keyboard shortcut to access chattr’. Highlight your prompt in the script, and chattr will process the highlighted lines as the prompt. The response will be inserted into your document.
Setting Up the Keyboard Shortcut
- From the top menu, choose
Toolsand then selectModify Keyboard Shortcuts. - In the search box, type “send prompt” to find the
chattradd-in. - Click the
Shortcutbox and type your preferred key combination (e.g., Ctrl+Shift+C).
Example Case: Text Prompt
Chattr can generate template code based on text prompts.Example Case: Code Prompt
Chattr can extend existing code based on your prompts.Conclusion
Adding chattr to your RStudio setup can ease your coding and learning experience. It allows you to get instant help, stay within your RStudio environment, and learn new functions and methods on the go, while getting help from AI models. By “talking” with your script, you can make your workflow more efficient and productive. Give chattr a try to see how it can transform your data analysis and coding tasks!
Below is the promised template code: Copy it to your clipboard by pressing the button in the top right corner, then paste it into your R script to get started!
# Tilburg.AI: `CHATTR`

# Install the chattr package from CRAN
install.packages("chattr")

# Load the chattr library
library(chattr)

# Specify your OpenAI API key here
# Replace "YOUR_SECRET_KEY_HERE" with your actual OpenAI API key
Sys.setenv("OPENAI_API_KEY" = "YOUR_SECRET_KEY_HERE")

# Optional: Avoid the pop-up prompt by selecting the model you want to use
# Choices include: "gpt35" or "gpt4"
chattr_use("gpt35")

# Launch chattr as a background job
# This allows you to continue writing and running other R code while the app is running
chattr_app(as_job = TRUE)

# Example Usage in R Scripts
# You can use the chattr() function to interact with the LLM directly from your R scripts
# Here is an example of a request to remove a column from a dataset
chattr("How can I remove a column from a dataset?")

# Example 2: Generating a linear regression model code
chattr("Generate a template code for linear regression in R using ggplot2 for visualization")

# Example 3: Extending existing code
existing_code <- "
# Existing Code:
library(ggplot2)
data(mpg)
"
# Note: The model need character strings as input.
extended_code <- chattr(paste(existing_code, "Extend this code to include a plot of engine displacement vs highway mileage."))

# Setting Up a Keyboard Shortcut for chattr in RStudio
# This section provides steps to create a custom keyboard shortcut to access chattr
# 1. From the top menu in RStudio, choose Tools and then select Modify Keyboard Shortcuts.
# 2. In the search box, type "send prompt" to find the chattr add-in.
# 3. Click the Shortcut box and type your preferred key combination (e.g., Ctrl+Shift+C).
# 4. Click Apply and then OK to save your new keyboard shortcut.

# Using the Keyboard Shortcut
# To use chattr with the keyboard shortcut:
# 1. Highlight your prompt in the script.
# 2. Press the keyboard shortcut you set up (e.g., Ctrl+Shift+C).
# chattr will process the highlighted lines as the prompt and insert the response into your document.